A Restore Point is the type of file that contains the configuration of your operating system. When you create a Restore Point in Windows 11, it saves the configuration of your operating system at that specific point in time. You can apply back that configuration to your operating system later. You may want to create a Restore Point when you install an application, install a windows update, or make other changes to the operating system of your machine. Later you can delete the restore points if the changes are applied well, or you might not be satisfied with the new changes and you restore the previous configuration.
Create Restore Points in Windows 11 Using Graphical Tools
We are using the System Properties to create a Restore Point. Follow the steps below to create Windows 11 Restore Points using System Properties.
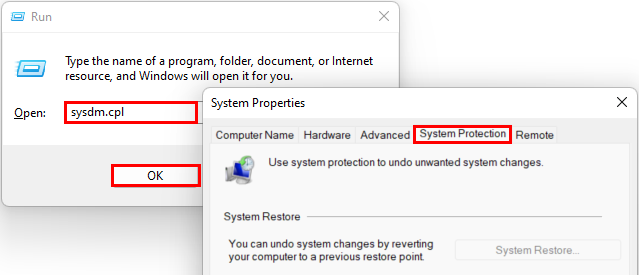
- Search for Create a Restore Point in the Windows Search Bar. Or, type
Sysdm.cplin the Run and click OK, then click on the System Protection tab of the System Properties window.
- Click on Configure.
- Click on Turn on system protection. You can specify the amount of Disk space for the restore points to be stored. Once the restore points data reaches the limit, the older restore points will be deleted. Then click OK to apply.
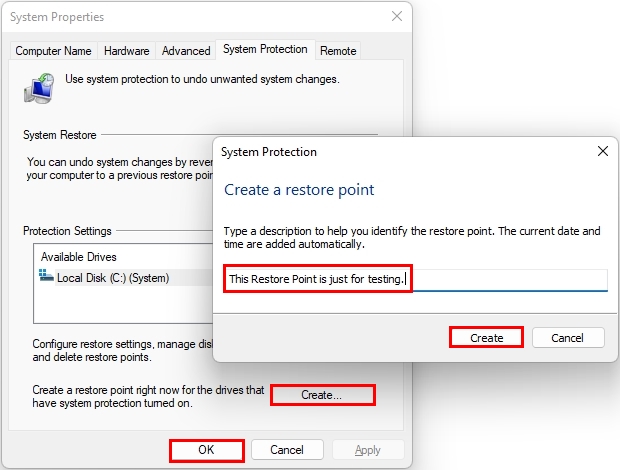
- To create a Restore Point, click on Create, type a descriptive name for your restore point, then click on Create.
- To see restore point lists and restore a specific restore point, click on System Restore.
- Select Choose a different restore point, then click on Next. If this option doesn’t appear, just click on Next.
- Choose a Restore Point from the list, then click on Next.
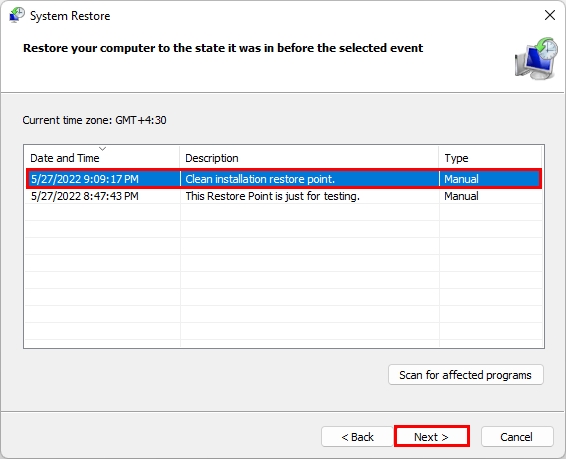
- Click on Finish. Your computer will be restarted, and the Restore Point will be applied.
You may also be interested to know How To Create Virtual Machine Checkpoints In Hyper-V.
Create Restore Points in Windows 11 Using Command Line Interface
There are two ways to create and configure Restore Point using Command Line Interface. You can run commands on PowerShell or Command Prompt to configure Restore Points.
Create Restore Point using Command Prompt
Follow the steps below to create Restore Points in Windows 11.
- Run CMD as administrator.
- Type the following command
wmic.exe /Namespace:\\root\default Path SystemRestore Call CreateRestorePoint "Testing Restore Point", 100, 7. The Testing Restore Point is the name of the restore point that I created during this article, and you can name your Restore Points differently. - To use more features of the restore point, type the
rstrui.execommand.
Create Restore Point Using PowerShell
Creating a Restore Point through PowerShell is not a more complex and time-consuming process. If you type the commands correctly, you may not receive errors. Keep in mind that by default, you can only create one Restore Point every 24 hours. You can change the frequency of Restore Point creation from the registry if you need. Follow the steps below to Restore Point on Windows 11 using Windows Powershell.
- Run PowerShell as Administrator.
- Type
Enable-ComputerRestore -Drive "C:\". I am going to enable Restore Points for drive C:\. You can add another location. - Type the following command.
Checkpoint-Computer -Description "Checkpoint for testing purpose" -RestorePointType "MODIFY_SETTINGS". You will see the following screen when PowerShell starts creating a Restore Point.

Restore Point helps you to save the current setting of your operating system and restore it back any time in the future. It is good to use Restore Points when you make some changes to your computer, and you are not sure that changes will happen correctly.
You may also be interested in these articles as well.
Delete System Restore And Shadow Copies In Windows 10.
How To Install And Enable Data Deduplication In Windows Server 2022.