Share Permissions allows groups of people to share files and folders connected to the same network. Since an organization shares its resources according to its employees’ needs, this Windows feature makes it easy to do so. Share Permissions in Windows 11 and the precedent versions provide this ability to implement appropriate access permissions to content. If you have installed Windows 11 on your computer and you want to share a folder using Share Permission, you may face trouble at first. And due to the security issue, Microsoft made file-sharing damn tricky. Don’t worry! In the following paragraphs, you will learn how to share files over the network on Windows 11.
You can read about NTFS Permission on NTFS Permissions in Windows Server 2022 and Windows 11 page.
How to use share permissions on Windows 11
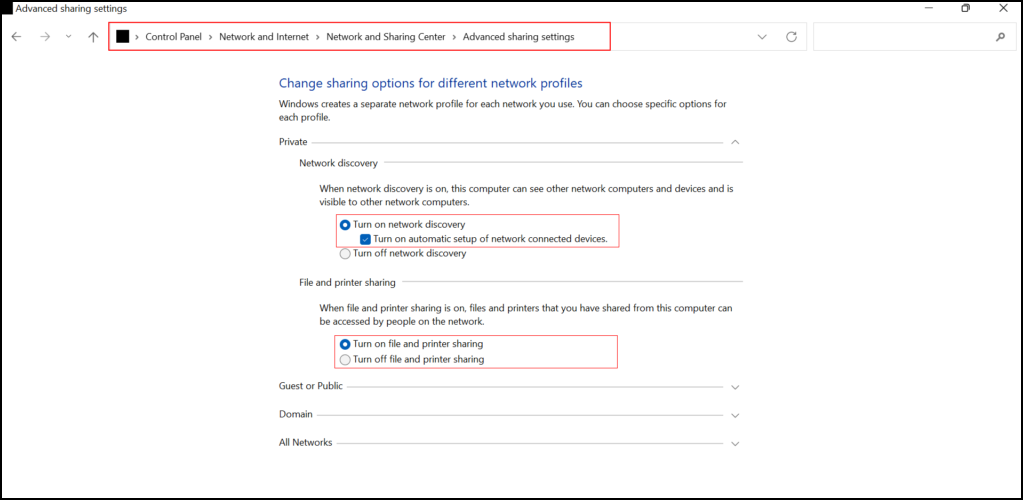
Before beginning to share a file, you must turn on the windows discovery options:
- Go to the Control Panel, and click on the Network and Internet.
- In the new window, click on the Network and Sharing Center.
- On the top left-hand side, click on the Changed advanced sharing settings.
- Turn on network discovery in the private/public/domain/all networks.
When you share folders with colleagues or friends, the built-in share permissions tools make the process easy for you. There are two types of shares in File Explorer.
1. Basic Share
- Open File Explorer and navigate to the folder you want to share; right-click on it, find the properties and click on it.
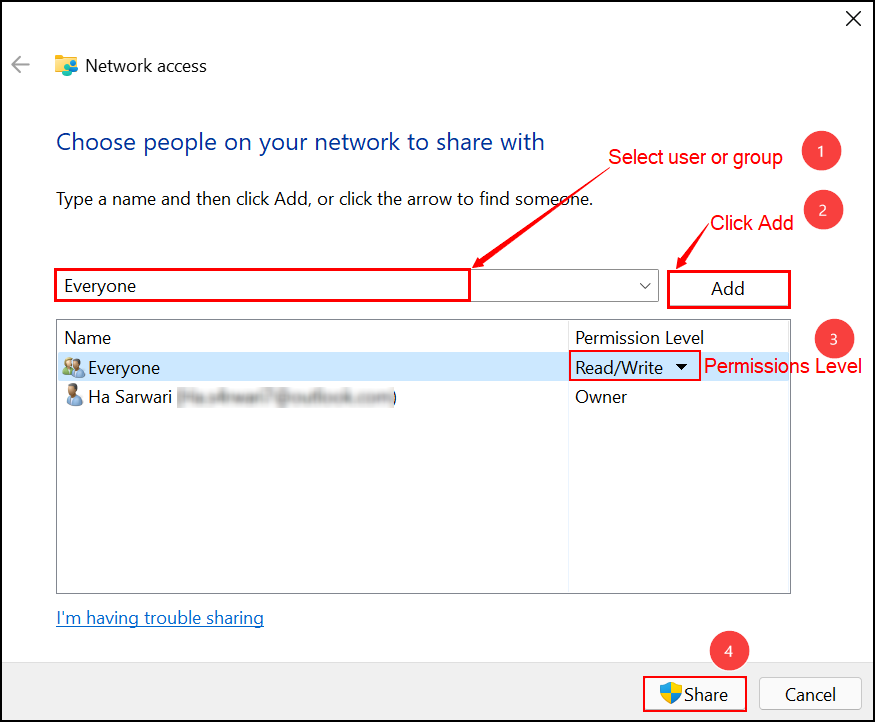
- Click on Sharing tab at the top of the window; you will see two options: Share (basic Share) or Advanced Sharing. If you click on the share option, you can quickly share folders with minimum configuration. Click on Share, and from the text box, find the user or group you want to share with.
- Finally, in the Network access window, choose the people you want to share with on the network, give the permission level to the selected user and click on the Share button. And your file is shared; click done.
2. Advanced Share
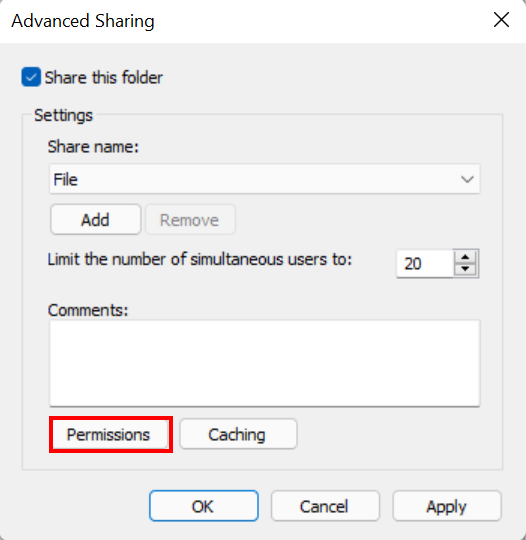
- Alternatively, when you open File Explorer, right-click on the intended folder, then click on the Properties, and this time click on the Advanced Sharing button, and in a new window, check the “Share this folder” option.
- In the Advanced Sharing window, you can change the share’s name and limit the number of users that can access this folder simultaneously, and write comments for users.
- Click on Permissions to specify the type of permissions and users you want to share with.
- If you want to specify the user, click on the Add button, write the user’s name in the text box, and click on the Check Name button. Or click on the Advanced and Find Now button to find and select the existing users manually.
- After selecting the user, you can now check the Allow or Deny boxes to define permission access to users. When you specify the permissions for users or groups, click Ok.
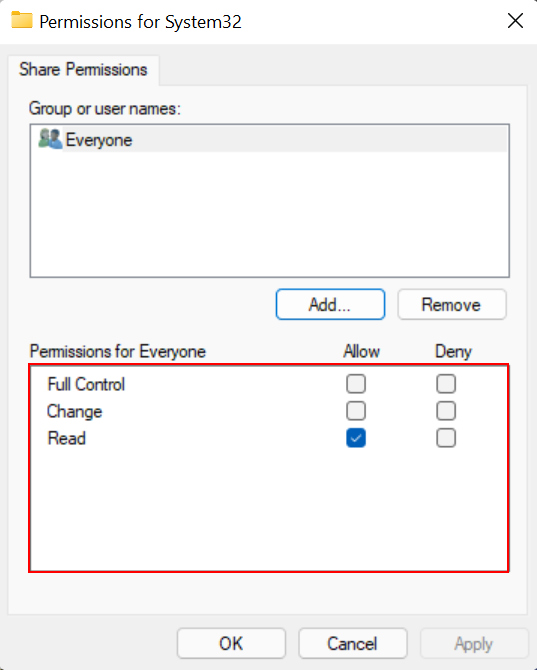
Note: there are three types of share permissions:
- Full control: the user can read, write, change, delete, and even change the permissions type.
- Change: the user can read, write, execute, and delete the folder.
- Read: the user can read and view the content. (This is the default permissions)
Fix file sharing problems
After you shared a folder and it did not work or did not show up in the network on other computers, you may need to enable some services on your computer.
- Search Turn Windows Features on or off in the search box or start menu and open it.
- Scroll down and find SMB 1.0/CIFS File Sharing Support in the new tiny window and expand it. Check SMB 1.0/CIFS Client. Restart your computer.
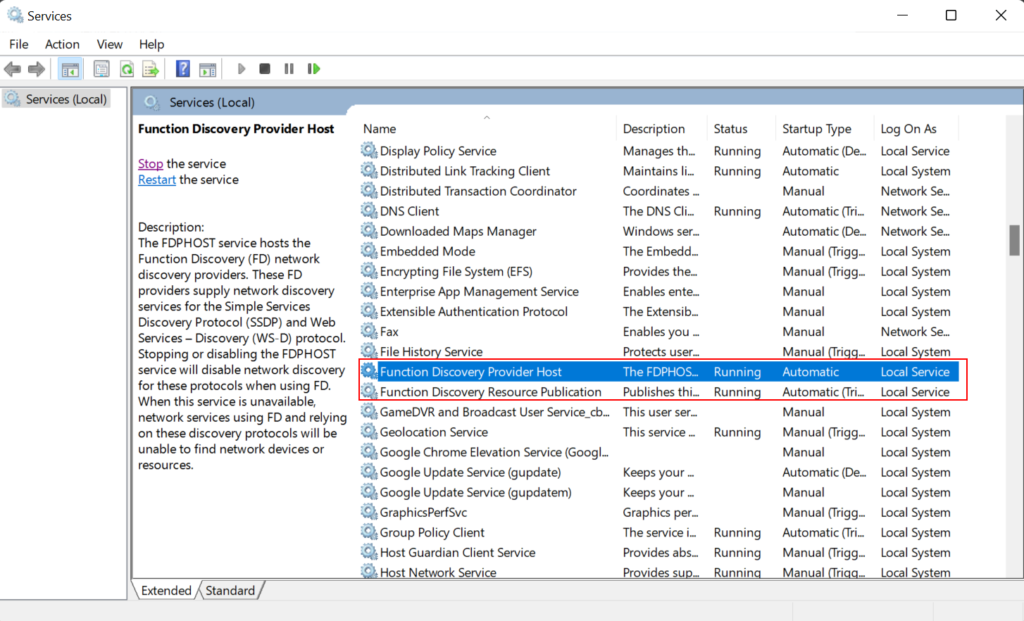
- Furthermore, if you still have problems, open the search box and search for Services and open it. Find Function Discovery Provider Host and Function Discovery Resource Publication, double click on each of them to open and set the start type to Automatic and Start them.
- Other services you need to set to Automatic and start are SSDP Discovery and UPnP Device Host.
After you set these four services to Automatic and start each of them, you need to restart your computer. After the restart of your computer, you can share folders in the network.
Conclusions
To conclude, the share permissions in Windows 11 add extra security dimensions to the organization’s network. Additionally, this feature allows users and groups to use shared folders and files according to their needs. We hope this article could help you solve the sharing problems in your network and if you have questions, write them in the comment section of this page.