Disk space management is a frequently required knowledge for a Windows user. It deals with the basic to advanced level operations performed on your computer’s disk space, such as creating new volumes, extending volume size, converting between Dynamic and Basic types, and so forth. While we rarely use those advanced operations, there are basic disk operations we most often use.
I will cover the following basic but frequently used topics throughout this article.
- How to create a new volume (Shrink Volume).
- How to increase volume size (Extend Volume).
- And, How to solve a disabled/greyed Extend Volume option.
The instruction works on Windows 8 and above. Note that if you already know any section, you may skip it and continue with the sections you are seeking answers to.
Note: I will accomplish the above topics graphically. Read Managing Hard Disks using PowerShell to manage disks with Powershell, and How To Manage Hard Disks With Command In Windows 10 to manage disks with Command.
Manage Disk on Windows | Shrink New Volume
Follow the steps below to shrink a new volume.
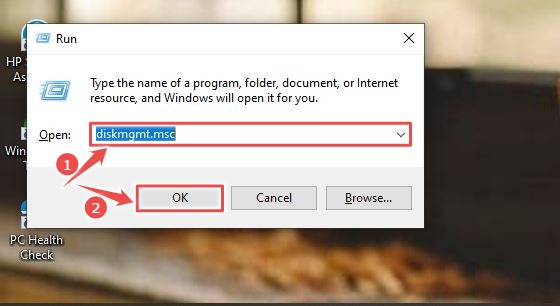
- Go to disk management window: press the Windows Key + R button on your keyboard to open the Run box. Type diskmgmt.msc in the Run Dialog Box and click Enter. Or right-click on This PC icon on your Desktop, click on the Manage option from the menu, and click on Storage >> Disk Management on the computer management window.
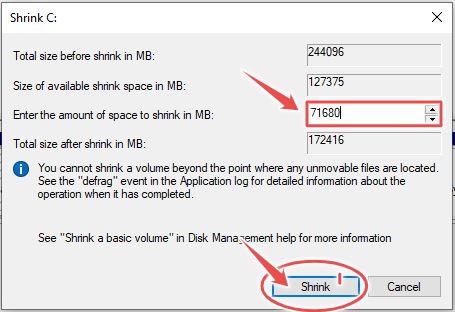
- On the Disk Management window, you can see the list of disks and their partitions already available. To create a new volume, right-click on the volume you want to create a new one from, and click on Shrink Volume from the menu. In my case, it is the partition with the volume letter (C:).
- Enter the storage amount of the new volume in MB inside the relevant box. In my case 71,680 MBs for a new volume of 70 GBs space.
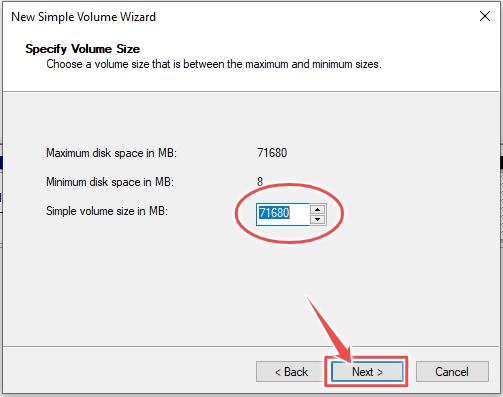
- You have shrunk the volume by now. You can see the new unallocated volume on the right side of the volume you created from. To make it usable, you need to allocate it. To do so, right-click on it and select the New Simple Volume option.
- Click Next on the New Simple Volume wizard. On the next window, specify the volume size and click on the Next button. Assign a drive letter on the next page and continue by clicking on the Next button.
- On the Format Partition window, select the file system, type the volume label and click on Next. Finally, click on Finish in the last window.
Now, you must see your new volume colour changed to blue, and it is usable on your computer.
Manage Disk on Windows | Extend Volume Size
It sometimes happens that you need to extend a volume size. For example, your C drive, which stores the operating system, does not have space for additional software you want to install. In such cases, you need to extend its space from other volumes. Follow the below simple steps to extend a volume size.
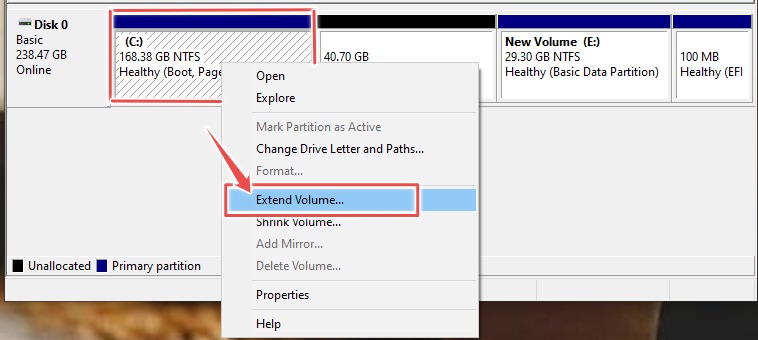
- On the Disk Management window, right-click on the volume you want to extend its size and click on the Extend Volume option. In my case it is volume C. Prior to this, an unallocated volume must exist on the right side of it, or else the option will be greyed and disabled. Create an unallocated volume using Shrink Volume (described above) and delete that new volume.
- Click Next on the first window that appears. On the Select Disks window, choose the volume(s) you want to add from the Available box at the left and add to the Selected box at the right (see the picture) Consequently, click on the Next button. Finally, click on the Finish button on the last window.
Check the partition you extended. You can see that the volume size increased by the size of the volume you added.
Why Extend Volume option is disabled/greyed?
As we mentioned earlier, sometimes the Extend Volume option is not active, which is not working. It happens when you do not have an unallocated volume at the right of the volume you want to extend. You can usually solve it by shrinking and deleting the volume at the right. But what if the volume is not shrinkable and does not give you an option? This issue appears when there are system-reserved partition(s) or another unchangeable volume(s) at the right side of the volume you extend.
Solutions to disabled/greyed Extend Volume option?
One solution that I cover here is to use third-party software. There is much software out there, but I have used user-friendly software: EaseUS Partition Master.
Follow the below steps to extend your volume space using Ease Partition Master.
- Download the software from HERE, and install it on your computer.
- Launch the software and click on Start Now button.
- The software lists all partitions on your computer (below picture). Let’s go with extending my C volume by space E partition.
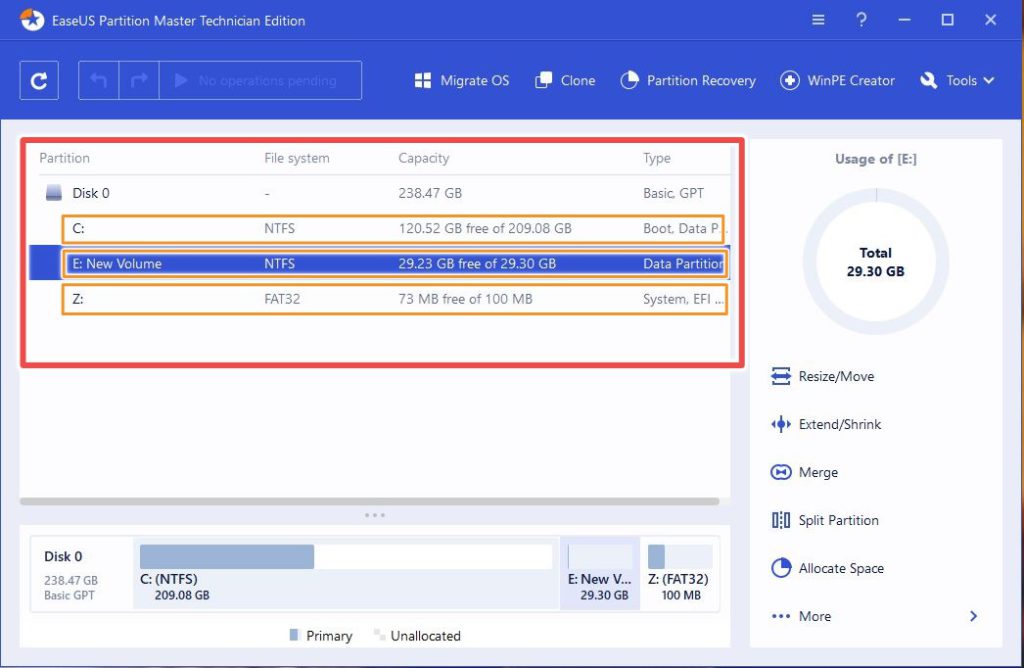
- First, you need to delete the E volume to make it unallocated. Right-click on it, and select Delete. Click OK on the confirmation window. The operation will be added to the operation button with a play icon on the top right corner. Click on it to execute the operation and click OK. Wait until it finishes the operation, and click on Finish, afterwards.
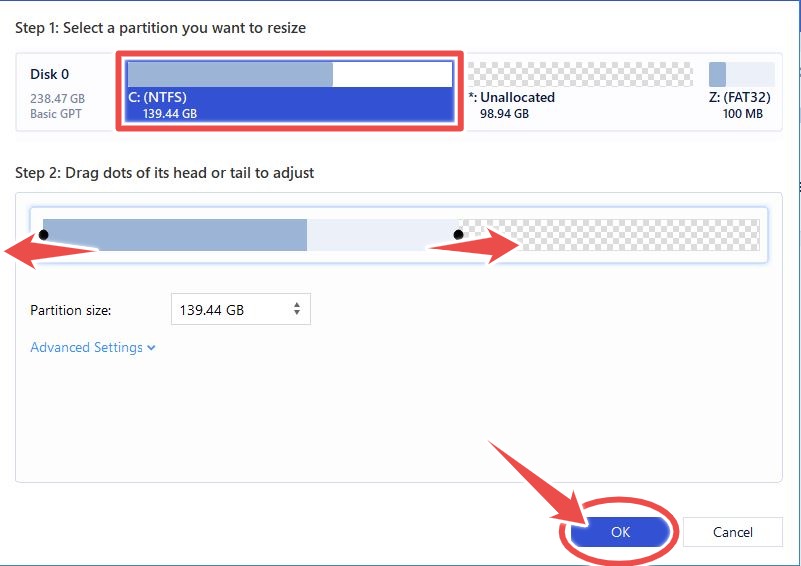
- Now, right-click on the target volume (the volume you want to extend), in my case C partition. Choose the Resize/Move option. A new window will appear on which you can select the partition you want. Drag the dot on the tails or head to extend the volume size from the two sides. Look at the visual changes on the top of the window while dragging the handles, and extend the volume accordingly. Even if there are unchangeable volumes in between the two partitions, the software detects them and extends the volume. Click OK when everything is set.
- The operation is added to the Execute Operation button. Click on Execute Operation to run it, and click on OK, consequently.
Some operations in EaseUS Partition Master may require a reboot to apply. Set the operations logically and execute them.
Conclusion
We have reached the end of this article. So far, we have discussed managing disk space on Windows 8, 8.1, 10, and 11. A tricky issue was to solve greyed/disabled extend volume option that we solved using EaseUS Partition Master.
I hope you found it helpful. If you have any questions regarding disk management, please share me in the comment section below.