This is how to configure VLAN on Cisco Switch or Virtual LAN on Cisco Switches in your network. A VLAN is a switched network that is logically segmented by function, project team, or application, without regard to the physical locations of the users. VLANs have the same attributes as physical LANs, but you can group computers even if they are not physically located on the same LAN segment. Any switch port can belong to a VLAN, and unicast, broadcast, and multicast packets are forwarded and flooded only to end stations in the VLAN.
Each VLAN is considered a logical network, and packets destined for stations that do not belong to the VLAN must be forwarded through a router or bridge or layer 3 switches. Because a VLAN is considered a separate logical network.
Here we just configure VLAN on Cisco switch and not talking about VTP, STP, and other advanced Switching techniques. It is the basic VLAN configuration. Read more about VLAN on Cisco Packet Tracer CCNA Lab.
How to Configure VLAN on Cisco Switch?
Let’s start to configure VLAN on Cisco switch using Cisco Packet Tracer. You can download the VLAN Lab or create your lab within Cisco packet tracer or other network simulators.
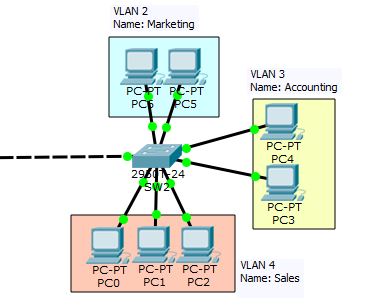
1. Open the VLAN lab and create these three VLAN and named Marketing, Accounting, and Sales. So let’s create them with the following commands.
2. First, change the switch name with “hostname” command.
Switch>enable
Switch#configure terminal
Enter configuration commands, one per line. End with CNTL/Z.
Switch(config)#hostname SW2
SW2(config)#
3. Now create the VLANs using “VLAN” command.
SW2(config)#vlan 2
SW2(config-vlan)#name Marketing
SW2(config-vlan)#vlan 3
SW2(config-vlan)#name Accounting
SW2(config-vlan)#vlan 4
SW2(config-vlan)#name Sales
SW2(config-vlan)#
4. Just type the “do sh vlan” command from config mod to see whether VLANs are created or not.
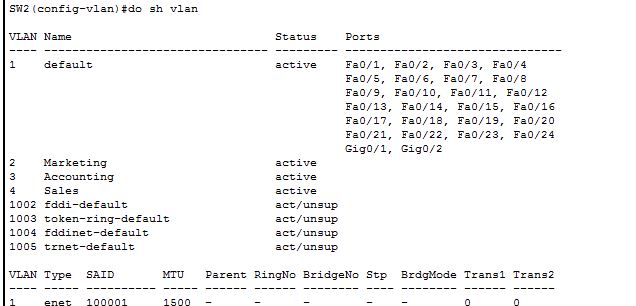
You see the VLANs are created successfully.
5. Now try to add interfaces to each of these VLANs. All the Interfaces ports are within the default VLAN and not yet grouped to Marketing, Accounting, and Sales. So try to add an interface to a VLAN with the “Switchport” command.
SW2(config)#interface fastEthernet 0/5
SW2(config-if)#switchport mode access
SW2(config-if)#switchport access vlan 2
SW2(config-if)#exit
SW2(config)#interface fastEthernet 0/6
SW2(config-if)#switchport mode access
SW2(config-if)#switchport access vlan 2
SW2(config-if)#
I have added the [fastEthernet 0/5] and [fastEthernet 0/6] to VLAN 2 which is our Marketing VLAN. In this method, we add each interface one by one, but you can use “Interface range” command to add a group of ports to a VLAN.
SW2(config)#interface range fastEthernet 0/2-4
SW2(config-if-range)#switchport mode access
SW2(config-if-range)#switchport access vlan 4
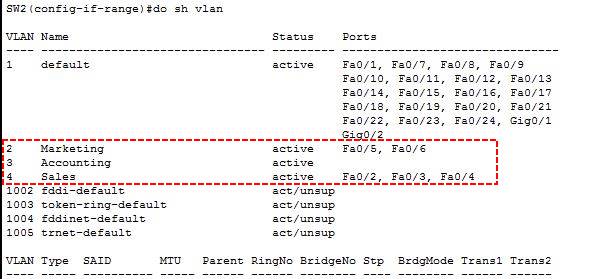
6. Finally type “do sh vlan” and see the result again.
Now you can set up VLAN on your network Switches. The next step is configuring Inter-VLAN Routing. I hope you find this article helpful and do comment us about the qualities and improvements of Technig articles.
It’s very very useful article. Thank you very much.
actually i am beginner, but i never seen any explanation similar to this one and so simple to do it, so helpful. Thank you guys you are the one!
thank u so much
It’s very useful configuration many thanks
it is so clear and best explanation ever, keep it up, much more thanks.
Excellent Explaination
i realy like it
Hey there, You have done an excellent job. I will certainly digg it and personally recommend to
my friends. I am sure they will be benefited from this website.
Nicely done, thanks a lot, this will help me!
Configuratie VPN RA RA(config)#crypto isakmp policy 110
RA(config-isakmp)#authentication pre-share RA(config-isakmp)#exit
RA(config)#crypto isakmp key cisco address 200.200.200.2
RA(config)#crypto ipsec transform-set MYSET esp-aes 128
RA(config)#crypto map MYMAP 10 ipsec-isakmp
RA(config-crypto-map)#match address 110
RA(config-crypto-map)#set peer 200.200.200.2
RA(config-crypto-map)#set transform-set MYSET
RA(config)#
RA(config)#interface g0/0
RA(config-if)#crypto map MYMAP
wow it is nice explanation to understand, thanks a lot, helpful!
cool