If you are a graphic a designer, you must know about different tips and tricks of Photoshop. One of them is creating a manipulation design in Photoshop. To create under water manipulation design, you need its exercise files, for downloading them click here. In this lesson we will use clipping mask, Brush tool, Free transform, warp and many more. I hope you will create this exciting Project.
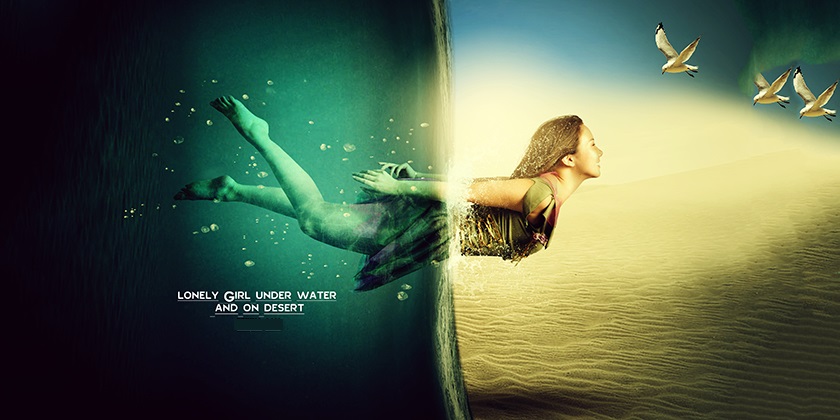
Under Water Manipulation Design with Photoshop
1. Press Ctrl+O to open, open dialog box, and then select 01-Desert and 02- Sea images. After opening them in Photoshop, go to Sea image, press Ctrl+A to select all, and then go to Edit menu- copy and paste it on the desert image.
2. After pasting it in desert Image, go to layer panel and then convert it to smart object, press Ctrl+ T to enable Free Transform, and then right click, select rotate 90 CW, and then resize it.
3. For Erasing the white part of the sea image, go to layer panel, click on layer mask and then press G to select Gradient tool, make sure its color must be white and black, and then like remove the white places of sea image like giving shadow.
4. Press Ctrl+ T to enable free transform and then right click select warp tool, change its shape like screenshot.
5. In this step we need to fill the background and takeout light from its middle. In order to do this, go to Layer-New fill layer- and then select Solid color, and then fill it with this 304144 code.
6. In order to create a simple light, decrease its opacity to 70%, Press G on the keyboard to select Gradient, and then change its setting form properties panel to Redial Gradient. And then draw it in the middle of the image to give you this shiny light.
7. In this step I need my background look more attractive, in order to do this, go to solid color in layer panel, press Ctrl+ J to duplicate it, and then drag it to the top of the layers and clip it to the sea layer by navigating to Layer- Create clipping Mask. After clipping Mask increase its opacity to 77% and change its blend mode to Multiply to give you this shape like screenshot.
8. In this step press Ctrl+ O to open, open dialog box and then open the Model Image in Photoshop. Cut the model form the background. You can use any tool which you desire to cut, but mostly I use pen tool for cutting it from background.
9. In this step I will replace in the background like screenshot, and then select lasso tool, draw a selection like screenshot, and right click select layer via cut. Go to layer panel select both body and layer 1, right click and then link them both.
Note: Before linking layers change layer 1, blend mode form normal to overly.
10. In this we need to create light shadow under the model image. In order to do this, go to layer panel, select color fill 1 and then create a new layer, and then press B on the keyboard to select Brush and then paint all over those places like screenshot with dbcab0 code.
Note: Select a brush with Hardness of 0 also with put its opacity between 30 to 40 %, and after painting them decrease its amount as much needed.
11. In order to make our mode more beautiful, go to Layer panel select the top layer and then navigate to layer – New Adjustment layer- and then select curves., and apply these settings. After applying those settings create mask by navigating to layer panel and then create Mask. After creating Mask Press B to select Brush and with white color selected some areas to light like screenshot.
Note: After applying those settings go to layer and then select Create clipping Mask.
12. In this step press B on the keyboard to select Brush, and then load the Brush form downloaded files. We are using these Brushes for creating water around its foots to look more attractive.
13. After loading them into Photoshop, select Brush 70 from Brush properties, and then for creating design like screenshot you have to increase the spacing settings first from Brushes panel by navigating to window- Brush, and increase its spacing painting.
Note: Remember before creating these parts, create a new layer on the color fill 1 copy layer from layer panel section, also paint with white color. After painting decrease its opacity to 80% from layer panel.
14. After painting, press Ctrl+ O to open, open dialog box, and this time open Png-water. Drag it to your project, after dragging press Ctrl+ T to enable free transform and then right click select Rotate 90 clockwise and position to the project like screenshot.
After applying those settings, I have decreased its opacity to 50%, and took a copy of it by pressing Ctrl+ J. For giving a good water fallen in this copied image I increased its opacity up to 100% and position that in other place of project and by pressing Ctrl+ U I changed its color to little blue like screenshot.
Note: For Hue/Saturation. I checked the colorized and Hue amount is 182, saturation amount is 35 also brightness is 0.
15. Again press Ctrl+ O to open, open dialog box and this open the water beauty Image and position it like screenshot, also change its blend mode from normal to Soft light.
Note: Remember this must be between the body and layer 1 layers which was linked together in previous steps, also don’t forgot to clip it to the layer 1 image.
Till this step your project will look like this. Go ahead and create a new layer under the layer 1, select this color by applying this c4f5ff and click one time with circle brush with hardness of 0%, also decrease its opacity to give you this shiny light on the image.
16. create a new layer ahead all layers and draw a circle by redial gradient it with fed1b3 code, and change its blend mode to screen to take your project like screenshot.
17. Again open the seagull image by pressing Ctrl+ O and position it to the corner of the project like screenshot. After that go to layer- New adjustments layer select Gradient with Black and white color, also change its blend mode to Soft light and decrease it amount between 70 to 80%, to give you this exciting image.
18. Again go to Layer- New adjustments layer and this step select curves, this time for curves I will work with color. Click on Double tringle ahead to each other and then select Blue. Apply these settings to give you these color also apply the same settings for Red. Again go to layer- New adjustments layer and this select color balance, after selecting apply these settings.
19. Go to the top layer press Ctrl+Shift+Alt+E to create snapshot of all layers in one layer, and then press Ctrl+ J to duplicate the layer and change its blend mode to linear light and navigate to Filter-custom and then select High Pass, put it amount to 0.5 pixel.
Note: you can also select all of your layer and group them to give you more space.
I hope you have learned something from this under water manipulation design, but again if you had any question I will there to answer you.