In previous tutorial, you have learn how to add and configure the WordPress Kirki customizer. In this tutorial we will continue on by learning how to add panel, section sections and control to our WordPress customizer. If you have came to this tutorial directly, I recommend to read the previous tutorial first.
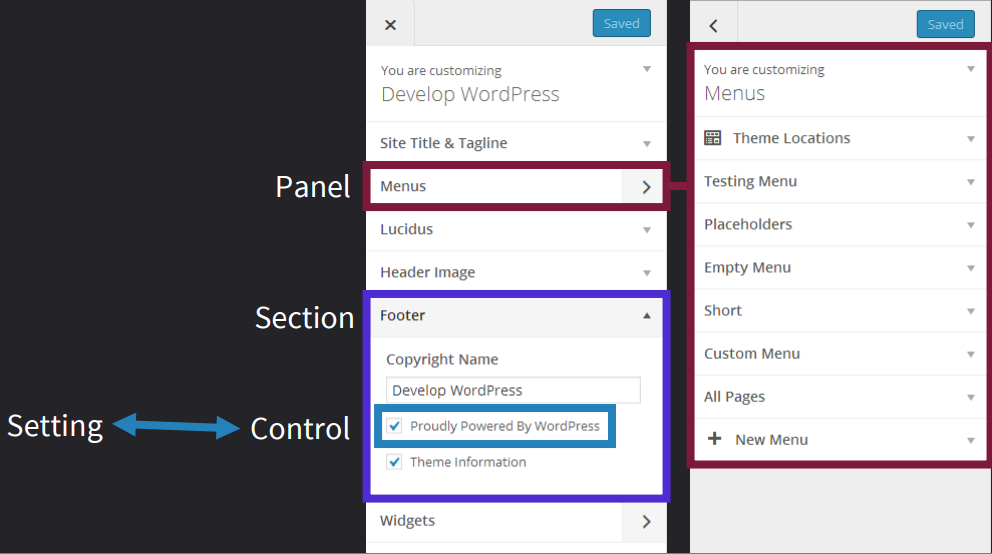
If you look at the above picture, you will understand the concept of a panel, section, settings and controls better. The first thing you will need to do is to create a panel. After creating the panel, you can add section and hook them inside that panel. Inside sections, you can add control or section or maybe to say it clearly, adding fields options.
Creating Panel in WordPress Kirki Customizer
So, let’s start adding our first line of code and make a panel in WordPress theme Customizer. To do that, all you need is to write an function and inside that function add your panel using add_panel() function.
Example:
function technig_options( $wp_customize ) {
	/**
	 * Add panels
	 */
	$wp_customize->add_panel( 'technig_theme_options', array(
		'priority'    => 10,
		'title'       => __( 'Theme Options', 'technig' ),
	) );
}
Now, inside technig_options() function, we can add our panel and sections. You can add as many panel as you want. But before that, we should hook this function to WordPress customize_register() function.
Here is how you do that.
add_action( 'customize_register', 'technig_options' );
Until now, if you check the WordPress Customizer, you will see nothing. It’s because, WordPress will show the panel if there is no section hooked to that. In the same way it will show the section if their is no setting hook in to it. So let’s add the section and hook it as well.
First, Create the section. Inside teching_options() function add the following code for adding a general option section.
	/**
	 * Add sections
	 */
       $wp_customize->add_section( 'general_options', array(
 		'title'       => __( 'General Options', 'technig' ),
 		'priority'    => 10,
 		'panel'       => 'technig_theme_options',
 	) );
Secondly, create a function for fields and hook it into general options section. For this example, will use image uploader to upload a favicon and than use it in our site.
function technig_fields( $wp_customize ) {

   /*General Options*/
    $fields[] = array(
	'type'        => 'image',
	'settings'    => 'fav_icon',
	'label'       => __( 'Favicon', 'technig' ),
	'description' => __( 'Upload your site favicon here', 'technig' ),
	'section'     => 'general_options',
	'default'     => '',
	'priority'    => 10,
);

    return $fields;
}

add_filter( 'kirki/fields', 'technig_fields' );
Now, check the WordPress Customizer, you have successfully add the first panel, section and fields with WordPress Kirki customizer. It will look like this.
How to Use the Value?
Now, you can use get_theme_mod() function to display the value of the field anywhere in your theme. For our demo, which is favicon, we will use it as favicon in the header of our site.
Example :
<link rel="shortcut icon" href="<?php echo get_theme_mod('fav_icon'); ?>" />
Conclusion.
This was the part two of the WordPress Kirki Customizer. We have successfully created our theme option panel with section, settings and fields inside. In the next part will discuss about more fields like radio, radio-image, checkbox, textrea and more. We will also discuss about conditional statements and default values in Kirki. I hope it has been informative for you. If you have any types of questions related to this topic, feel free to comment it below. 🙂