The PowerShell cmdlets for storage management is new command line tools that help Sysadmins to manage hard disk with PowerShell. The old style managing hard disk with Diskpart is already in it’s state. You can still use Diskpart for managing hard disk on Windows operating systems.
So in this article you will learn how to simply manage hard disk with PowerShell in Windows 10 and Servers. No matter what Windows Server you are using 2012, Windows server 2016, it’s applicable for all Windows Servers.
Manage Hard Disk with PowerShell
Let’s manage hard disk with PowerShell with disk and storage cmdlets. If you don’t know about PowerSehll or command line interface on Windows, try to learn some basic command line.
#1. List disk with PowerShell
Listting current disk with PowerShell is displaying with “Get-disk” command. So let’s do it.
1. Open Windows PowerShell. It’s better to run it as administrator. Then type “Get-disk” and press enter. It will list all current hard disks, even virtual hard disks.
Using pip line in PowerShell will help you run multitask command. For instance type “Get-Disk | FT -Autosize” and press enter. It will list all hard disk within a clear table.
Yes, it shows a better and clear result. You even can find more specific disk information. For example type “Get-disk | Where-Object IsSystem -eq $true | FT -AutoSize” and press enter.
This command show only the hard disk where Windows installed on, the system hard disk. So good and lets test another command.
Type the preview “Get-disk | Where-Object IsSystem -eq $false | FT -AutoSize” and just change the -eq parameter to list the non system hard disks on your computer.
That is enough for listing or displaying hard disks on a system. We will work to learn more about different listing of hard disks.
#2. Format Hard Disk with PowerShell
Formatting a hard disk will remove everything from a hard disk. So be careful when you are doing clear some disks.
1. To list all partitions of a hard disks type “Get-partition -DiskNumber 1“. It will list all partitions or volumes of a hard disk.
Now, you see the current status of a hard disk. You format hard disk with “Clear-Disk” command. Let’s clear the disk number 1.
2. To clear a disk type “Clear-Disk 1 -RemoveData” and press enter. Then type Y when prompt you about are you sure you want to perform this action?
The disk cleared and formatted successfully. If you want to learn more, just try different parameters with clear-disk command and see the result. Just remember that when your hard disk contains OEM files, use the -RemoveOEM parameter.
#3. Initializing Hard Disk with PowerShell
When you clear or format a hard disk, it need to be initialize after clearing. So to initialize hard disk and get ready to use, type “Initialize-Disk -Number 1 -PartitionStyle GPT” and press enter.
Yes, the task done and hard disk is ready for creating new partition or volume. So let’s continue to create some partitions on this hard disk.
#4. Create Partition with PowerShell
Like old style diskpart command line utility, you can create partition with PowerShell using “New-Partition” or using “Get-Partition” list partitions of a hard disk.
1. To create a new partition simply type “New-Partition -DiskNumber 1 -Size 25GB -AssignDriveLetter” and press enter.
The command will create a new partition 25GB on disk 1. It’s good to see the volume created successfully.
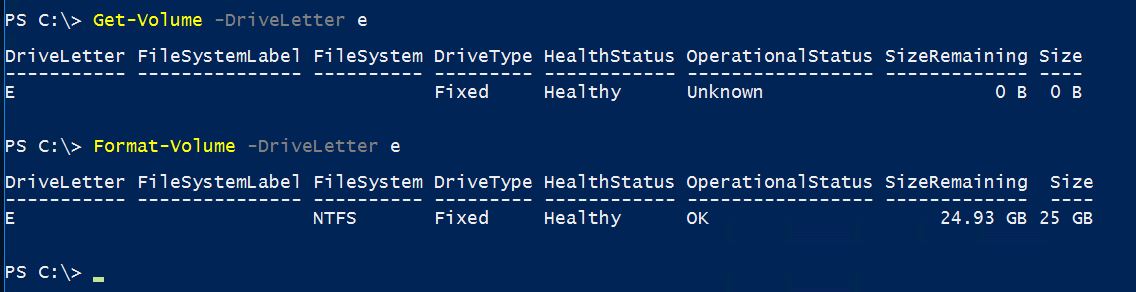
2. To see the new created volume, type “Get-volume -DriveLetter e” and press enter. The result shows the disk with 0 byte size.
3. Now type “Format-volume -DriveLetter E” and press enter to format the drive E.
By default the volume FileSystem is NTFS, but you can assign the FileSystem with “-FileSystem” parameter.
OK, the new partition or volume is ready for use. Try to manipulate with commands and learn more about format-volume cmdlet.
#5. Delete Partition with PowerShell
As you have created partition with New-Partition command, you can delete a partition with Remove-Partition. To remove ad partition simply type “Remove-Partition -DriveLetter E” and press enter.
You can use Set-Partition with -IsActive parameter to active the volume in order to boot the system. Your hard disk type should be MBR, not GPT. And for more about Disk managment with Windows PowerShell, read the PowerShell documents on Microsoft website.
Hope you learn something new from this article. I’m sure it’s not complete, but your feedback may make our articles better and complete. So feel free to ask your questions.