Linux desktop and server virtualization configuration on VMware is a hot topic of networking and cloud computing. You have installed a Linux on your virtualized lab but not work perfectly. After installing Linux on a VMware, you need to install VMware tools correctly to integrate virtual machine with the host system. VMware tools are a suite of utilities that enhance the performance of the virtual machines guest operating system and improves the management of the virtual machine. Without VMware Tools installed in your guest operating system, guest performance lacks important functionality.
Installing VMware Tools eliminates or improves these issues:
- Low video resolution.
- Inadequate colour depth.
- Incorrect display of network speed.
- Restricted movement of the mouse.
- Inability to copy and paste and drag-and-drop files.
- Missing sound.
- Provides the ability to take quiesced snapshots of the guest OS.
- Synchronizes the time in the guest operating system with the time on the host.
VMware Tools includes these components:
- The VMware Tools service.
- VMware device drivers.
- The VMware user process.
- VMware Tools control panel.
Read more about VMware Tools features and functionalities on overview of VMware tools.
Install VMware Tools Correctly on Ubuntu Linux
The steps to install VMware Tools vary depending on the VMware product and the guest operating system you have installed. In this post, we are going to install VMware tools correctly on Linux Ubuntu using VMware workstation. The host system is a Windows 10.
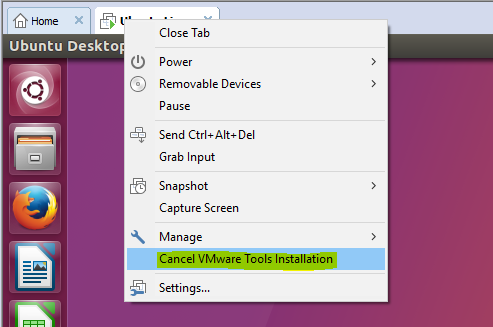
1. Right-click the Ubuntu virtual machine on VMware workstation then click Install VMware Tools to mount the VMware tools to DVD Rom.
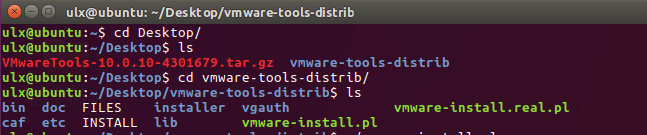
2. Open the DVD on the Ubuntu sidebar and copy the VMware-tools-distrib from inside the VMwareTools***tar.gz compressed file to the desktop.
3. Now, run the terminal command line and navigate to VMware folder on the desktop. Type “cd Desktop” to go to the desktop directory, then type “ls” to see what you have on your desktop. Navigate to VMware tools folder with “cd” (change directory) command.
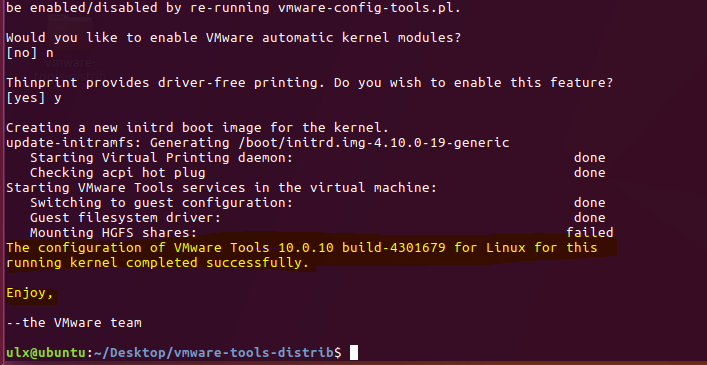
4. Finally, type the “sudo ./vmware-install.pl -d” command to start VMware tools installation. When the installation has been finished, once restart your system to apply the changes.
5. Check the final reports whether the installation finished successfully or not. If you experience issues when installing VMware Tools, comment us for troubleshooting help.
Additional Information:
The VMware Tools are normally bundled with VMware products as well as security updates when applicable. As of VMware Tools version, customers also have the option to download from My VMware. Two different downloadable archives are presented, one for recent guest Operating System releases and another that covers older, legacy guest operating system versions. VMware Tools are typically forward and backward compatible with several product releases. For more information, see VMware Compatibility Guide.