Sometimes it’s not possible to change network profiles using the graphical interface. The network profiles or network categories are Private networks, Public Network, and Domain Network. This is how to change network profile using PowerShell.
Change Network Profile Using PowerShell
It’s another PowerShell articles related to network configuration with PowerShell. It’s using PowerShell to manage network adapters with PowerShell. So try to read the preview PowerShell articles also.
The three network profiles in Windows 10 are:
- Private: Computers on a private network can belong to a homegroup. Network discovery is turned on for private networks, which allows you to see other computers and devices on the network.
- Public: Designed to keep your computer from being visible to other computers around you and to help protect your computer from any malicious software from the Internet.
- Domain: It belongs to the enterprise network. It’s controlled by network admin and can’t be selected and changed locally.
So let’s try to change the network profile using PowerShell in Windows 10. This tip is work on all Windows clients and Servers.
1. Open PowerShell and run it as administrator. Then type “Get-NetAdapter” and press enter to see all network adapters.
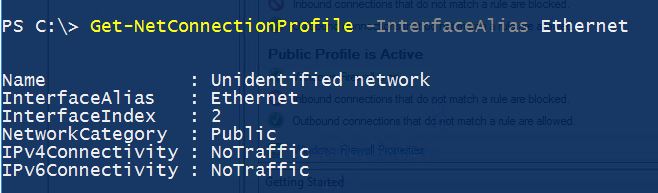
2. To find the network adapter profiles, type “Get-NetConnectionProfile” and press enter. You can specify the network connection with “-InterfaceAlias” parameter. It shows only the exact network connection information.
The network category is public, so try to change to private network with “Set-NetConnectionProfile” cmdlet.
Note: It’s not possible to change the network adapter category to a domain when there is no domain available. It’s only changed Private network to public and public to private network using PowerShell.
3. To change Public network to Private network, simply type “Set-NetConnectionProfile -InterfaceAlias Ethernet -NetworkCategory Private” and press enter.
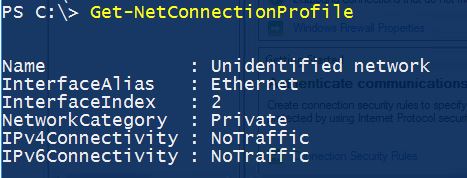
4. To see the result, type “Get-NetConnectionProfile” or specify the network adapter name with “-InterfaceAlias” parameter.
Good, the public network has been changed to private network successfully. You can do the same to change the private network to the public.
Hope this simple PowerShell command will help you to change network profiles easily on the enterprise network and home network. So let us know if you have any question about PowerShell.
thankful from this article.
could you tell me! can i use this all command on CMD to change Network Profile?
how to change the name from “Unidentified Network” to something more realistic? Or list the objects we can change?
Thanks for this article. It was very helpful.